Unleash Your Inner Carpenter: Rustic Country Woodworking Projects
Craving the charm of rustic country furniture but dreading the price tag? Fear not, aspiring woodworkers! This guide dives into the satisfying world of DIY country furniture, offering detailed plans and inspiration to craft beautiful, functional pieces for your home. We'll explore simple yet stunning projects perfect for beginners and seasoned crafters alike, focusing on techniques that highlight the natural beauty of wood and the rustic aesthetic.
Choosing Your Rustic Style
Before you grab your tools, define your vision. Rustic country style encompasses a broad spectrum, from the refined elegance of farmhouse chic to the rugged charm of reclaimed wood furniture. Consider the specific look you want to achieve. Do you envision smooth, painted surfaces or the character of naturally weathered wood? Will you incorporate metal accents or prefer a purely wooden aesthetic? Browse Pinterest or online furniture galleries for inspiration. Selecting a cohesive style will guide your material choices and construction techniques.
Essential Tools and Materials
Building rustic furniture requires a blend of essential woodworking tools and carefully selected materials. Invest in quality tools to ensure precision and safety. This includes a reliable circular saw or miter saw, a drill with various drill bits, a sander (both orbital and belt sander are recommended for different stages of the project), clamps, measuring tape, and safety glasses. For materials, prioritize wood types known for their rustic appeal, such as reclaimed barn wood, pine, oak, or cedar. Consider pre-treating your wood with a protective sealant to enhance its longevity and resistance to moisture and pests.
Material Selection Deep Dive
The choice of wood dramatically impacts the final look and feel of your project. Reclaimed wood offers unparalleled character, showcasing knots, imperfections, and the patina of time. However, it can be more challenging to work with due to its variability. Pine is a budget-friendly option, easily accessible and relatively easy to manipulate. Oak offers durability and strength, while cedar boasts its natural aromatic properties and resistance to decay, making it ideal for outdoor projects. Remember to check for any imperfections or warping before beginning construction.
Easy DIY Projects for Beginners
Start with projects that build confidence and hone your skills. These simpler designs provide a fantastic introduction to rustic woodworking while still yielding beautiful results.
Rustic Coffee Table
A simple, sturdy coffee table using reclaimed wood planks and hairpin legs is a perfect starting point. You'll learn basic joinery techniques like screwing and bolting. The raw, unfinished look of the wood planks complements the sleekness of the hairpin legs, resulting in a unique and charming piece.
DIY Farmhouse Shelves
Constructing floating shelves is an excellent beginner project. These can be made from simple wooden boards, and you can customize the length, width, and number of shelves to suit your needs. Use brackets that complement the rustic aesthetic, such as industrial metal brackets or simple wooden supports.
Advanced Projects for Experienced Crafters
Once you've mastered the basics, you can tackle more intricate projects showcasing your woodworking expertise.
Rustic Dining Table
Building a dining table requires more advanced joinery techniques, like mortise and tenon joints, to create a sturdy and lasting piece. Carefully select your wood and plan the design meticulously. A long, wide table offers a focal point for your dining area, and you can customize its style to match your existing furniture.
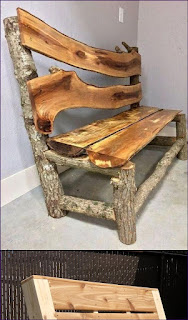
Rustic Bench with Storage
Challenge yourself with a project combining form and function. A rustic bench with built-in storage incorporates drawers or a hinged seat to provide extra storage space. This project involves detailed planning and precise cuts to ensure proper functionality and aesthetics.
Finishing Touches for Authentic Rustic Charm
The final step is enhancing your rustic furniture's appeal. Consider applying a natural wood stain to bring out the wood's grain and color, or opt for a distressed paint finish for a more aged look. You can also add metal hardware that complements the rustic aesthetic. Finally, consider applying a clear sealant to protect your creation from the elements and daily wear and tear. Your finished product will be a testament to your craftsmanship and a cherished addition to your home.
Remember, the beauty of DIY lies in the imperfections. Embrace the unique character of each piece, and enjoy the journey of creating something beautiful with your own two hands!


No comments:
Post a Comment
Note: Only a member of this blog may post a comment.